Implementing Real-Time Surface Crack Detection System: Predictive Maintenance with EdgeAI
15 Aug, 2023
Article #3 of Spotlight on Innovations in Edge Computing and Machine Learning: A computer vision system that detects and localizes the surface cracks in concrete structures for predictive maintenance.
This article is part of Spotlight on Innovations in Edge Computing and Machine Learning. The series features some unique projects from around the world that leverage edge computing and machine learning, showcasing the ways these technological advancements are driving growth, efficiency, and innovation across various domains.
This series is made possible through the sponsorship of Edge Impulse, a leading player in providing the platform for building smarter, connected solutions with edge computing and machine learning.
In the evolving narrative of modern industry, the role of artificial intelligence (AI) in predictive maintenance is becoming increasingly critical. This notion moves beyond the mere use of advanced tools; it represents a paradigm shift towards an era where machinery upkeep is not just reactive, but proactively managed and optimized with precision.
Through this detailed examination, we delve into the application of AI in preventive maintenance, specifically focusing on surface crack detection using EdgeAI. We elucidate how the fusion of these advanced technologies promises not only improved operational efficiency but also paves the way for industrial sustainability. In doing so, we critically assess the implementation strategies, technical underpinnings, and benefits of this convergence.
By forecasting potential issues before they evolve into significant problems, the industry can avoid costly downtime and promote a more secure, efficient, and ultimately, successful operational framework. Thus, this article serves as both an exploration of the transformative potential of EdgeAI in surface crack detection and a call to reimagine our approach to industrial maintenance in the face of rapidly advancing technology.
Surface Crack Detection with Seeed reTerminal
A computer vision system that detects and localizes the surface cracks in concrete structures for predictive maintenance.
Created By: Naveen Kumar
Public Project Link: https://studio.edgeimpulse.com/public/119583/latest
A 50-year-old bridge collapsed in Pittsburgh (Pennsylvania) on January 28, 2022. There is only one reason why a sturdy structure such as a concrete bridge could suddenly collapse: wear and tear.

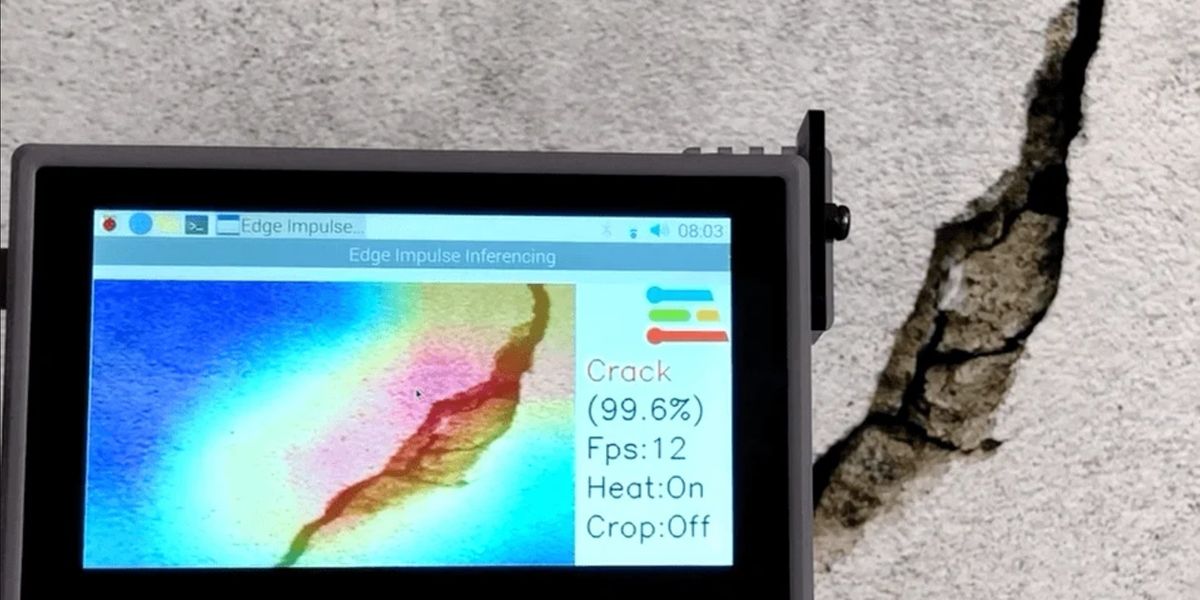
Concrete structures generally start deteriorating after about 40 to 50 years. For this reason, overlooking signs of wear can result in severe accidents, which is why the inspection and repair of concrete structures are crucial for safeguarding our way of life. Cracks are one of the important criteria used for diagnosing the deterioration of concrete structures. Typically, a specialist would inspect such structures by checking for cracks visually, sketching the results of the inspection, and then preparing inspection data based on their findings. An inspection method like this is not only very time-consuming and costly but it also cannot accurately detect cracks. In this project, I built a surface crack detection application using machine learning. A pre-trained image classification model is fine-tuned using the Transfer Learning with the Edge Impulse Studio and deployed to the Seeed reTerminal (based on Raspberry Pi Compute Module 4) which detects surface cracks in real-time and also localizes them.
Why localization?
Why do we want to localize the detection using an image classification model? Can't we use the object detection model? Yes, we can use the object detection model but we would need to add bounding boxes to thousands of samples manually. Existing object detection models may not be a good choice to auto-annotate these cracks since they are trained on definite shape objects. Repurposing the classification model for localizing the detection saves a lot of effort and still would be able to identify the regions of interest.
How does it work?
The CNN (convolutional neural networks) with GAP (Global Average Pooling) layers that have been trained for a classification task can also be used for object localization. That is, a GAP-CNN not only tells us what object is contained in the image - it also tells us where the object is in the image, and through no additional work on our part! The localization is expressed as a heat map (class activation map) where the color-coding scheme identifies regions that are relatively important for the GAP-CNN to perform the object identification task.
Hardware Setup
Since I wanted a compact and portable hardware setup, we will be using Seeed reTerminal which comes with an LCD and buttons in a compact form. It is powered by a Raspberry Pi 4 Compute Module with 4 GB RAM which would be sufficient for this proof-of-concept project. We would need Raspberry Pi Camera V2 and an acrylic mount for it.
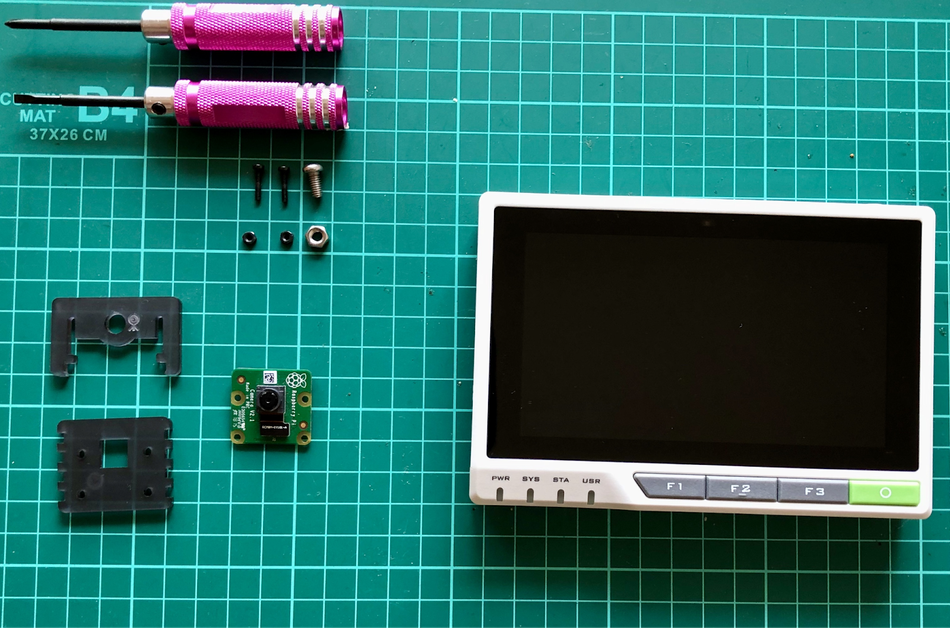
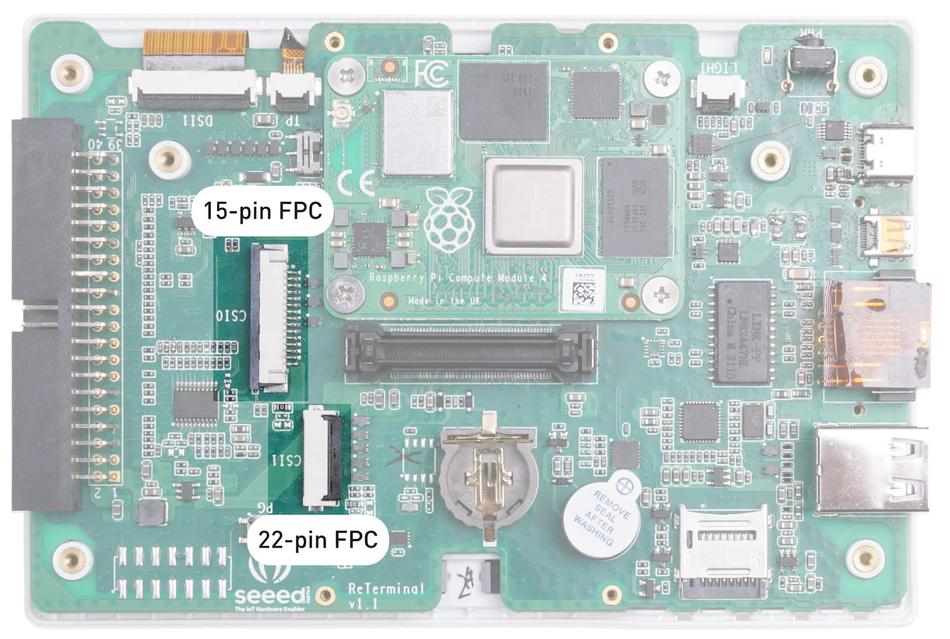
We would need to open the back cover of the reTerminal to access the 15-pin FPC camera connector. Please follow the step-by-step instructions here: https://wiki.seeedstudio.com/reTerminal.
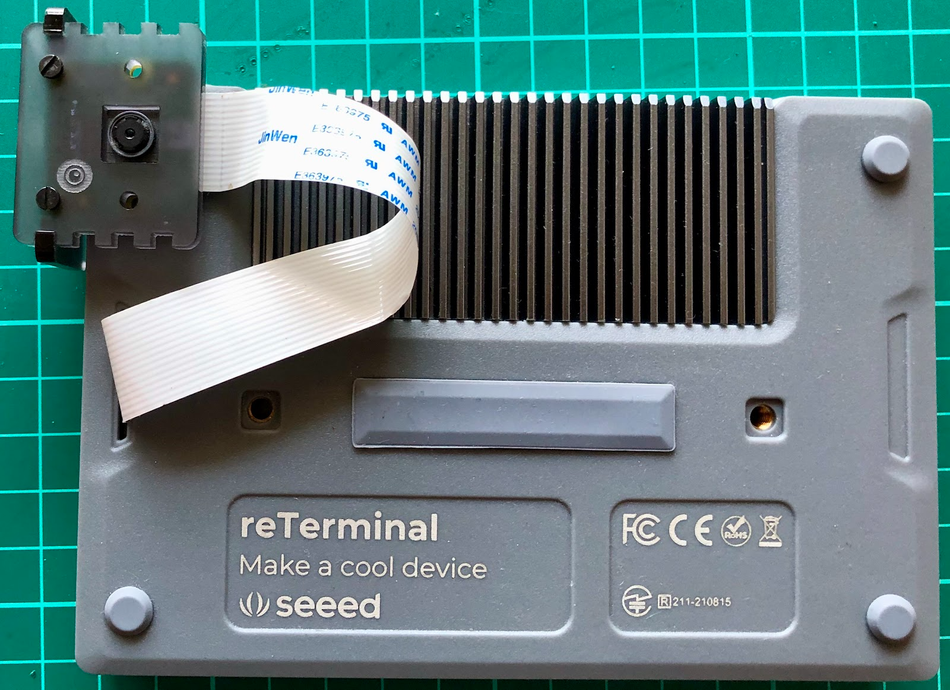
The camera is connected using the FPC ribbon cable and attached to the reTerminal using the mount.
Setup Development Environment
The reTerminal comes with 32-bit Raspberry Pi OS but We will be using 64-bit Raspberry Pi OS for better performance. Please follow the instructions here to flash the 64-bit Raspberry Pi OS: https://wiki.seeedstudio.com/reTerminal-FAQ.
To install the python packages which we will be using in the inferencing code, execute the commands below.
$ sudo pip3 install seeed-python-reterminal
$ sudo apt install -y libhdf5-dev python3-pyqt5 libatlas-base-dev
$ pip3 install opencv-contrib-python==4.5.3.56
$ pip3 install matplotlib
Data collection
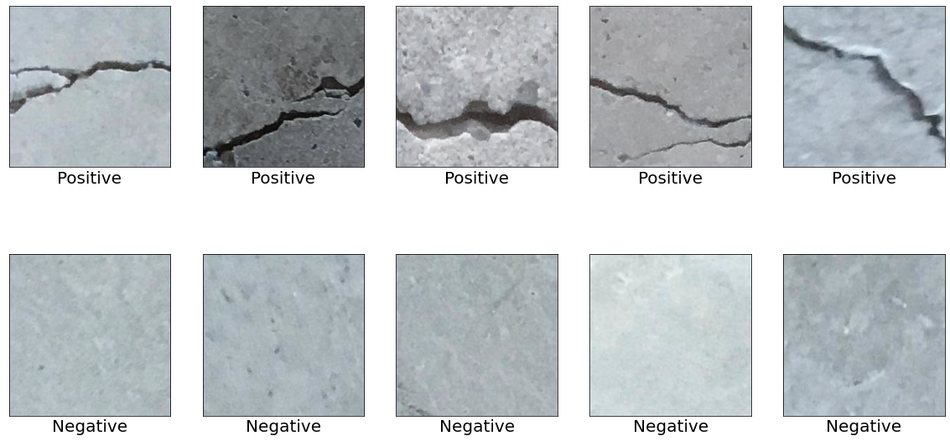
The datasets were downloaded from the Mendeley Data (Concrete Crack Images for Classification). The dataset contains various concrete surfaces with and without cracks. The data is collected from multiple METU Campus Buildings. The dataset is divided into two negative and positive crack images for image classification. Each class has 20,000 images with a total of 40,000 images with 227 x 227 pixels with RGB channels.
To differentiate crack and non-crack surface images from the other natural world scenes, 25,000 randomly sampled images for 80 object categories from the COCO-Minitrain, a subset of the COCO train2017 dataset, were downloaded. The data can be accessed from the links below.
Surface Crack Dataset: https://data.mendeley.com/datasets/5y9wdsg2zt/2
COCO-Minitrain dataset: https://github.com/giddyyupp/coco-minitrain
Uploading data to Edge Impulse Studio
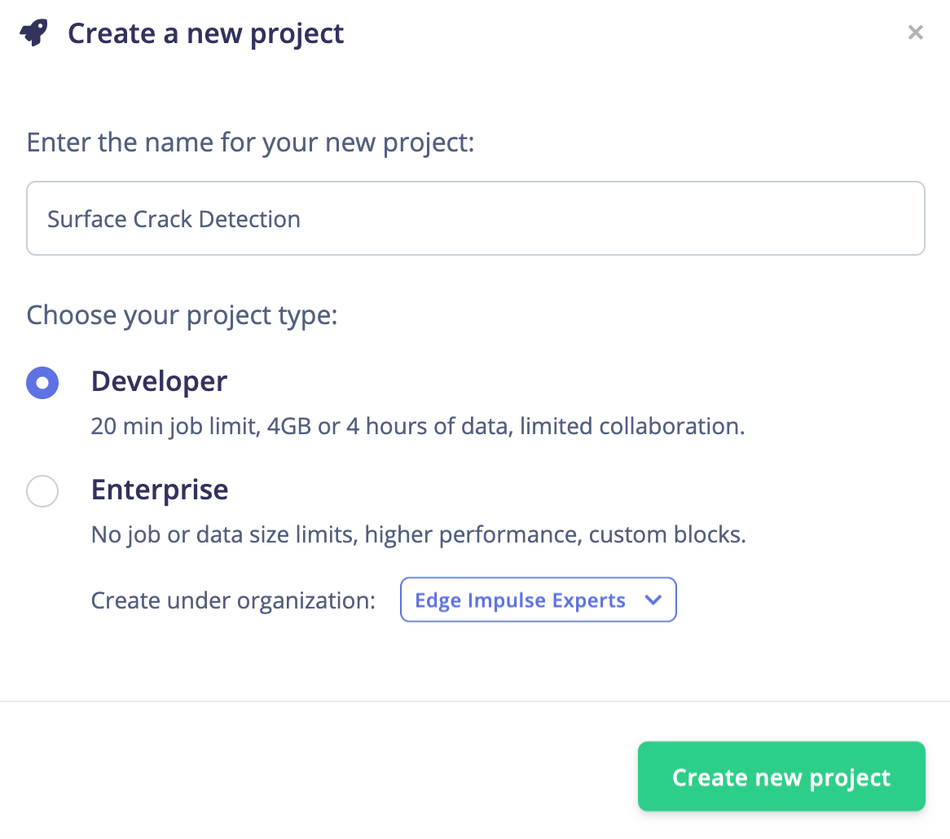
We need to create a new project to upload data to Edge Impulse Studio.
The data is uploaded using the Edge Impulse CLI. Please follow the instructions to install the CLI here: https://docs.edgeimpulse.com/docs/cli-installation.
The downloaded images are labeled into 3 classes and saved into the directories with the label name.
Positive - surface with crack
Negative - surface without crack
Unknown - images from the 80 objects
Execute the following commands to upload the images to the Edge Impulse Studio. The datasets are automatically split into training and testing datasets.
$ edge-impulse-uploader --category split --label positive positive/*.jpg
$ edge-impulse-uploader --category split --label negative negative/*.jpg
$ edge-impulse-uploader --category split --label unknown unknown/*.jpg
We can see the uploaded datasets on the Edge Impulse Studio's Data Acquisition page.

Training
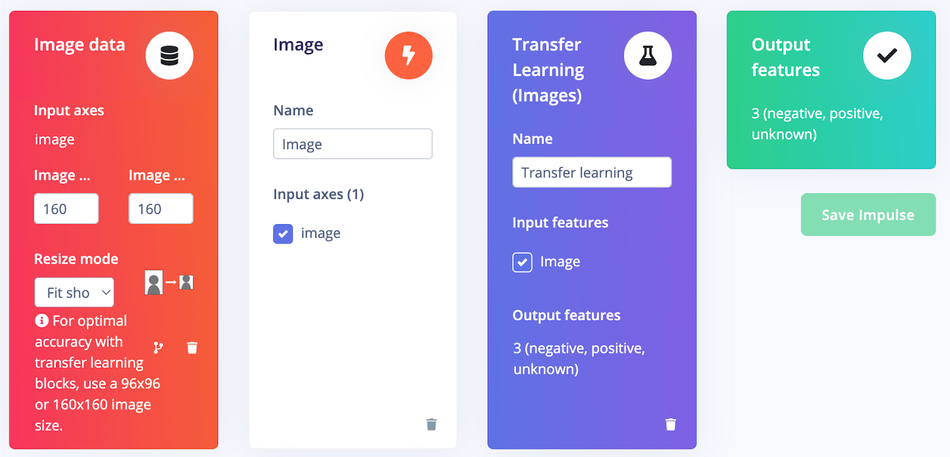
Go to the Impulse Design > Create Impulse page, click Add a processing block, and then choose Image, which preprocesses and normalizes image data, and optionally reduces the color depth. Also, on the same page, click Add a learning block, and choose Transfer Learning (Images), which fine-tunes a pre-trained image classification model on the data. We are using a 160x160 image size. Now click on the Save Impulse button.
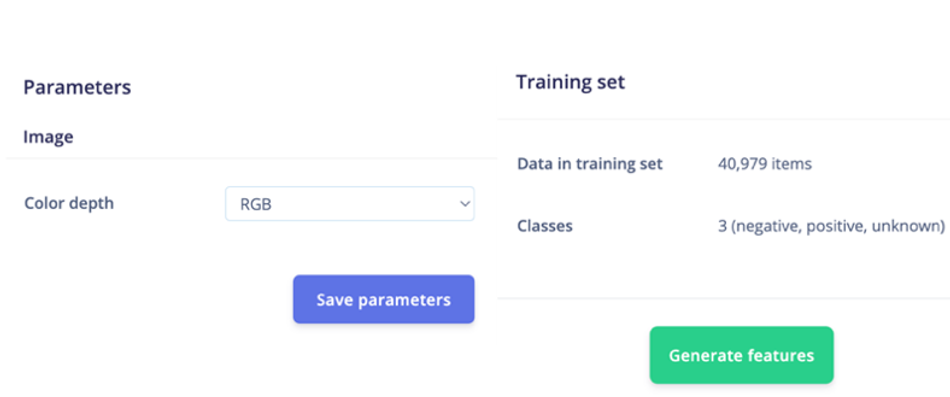
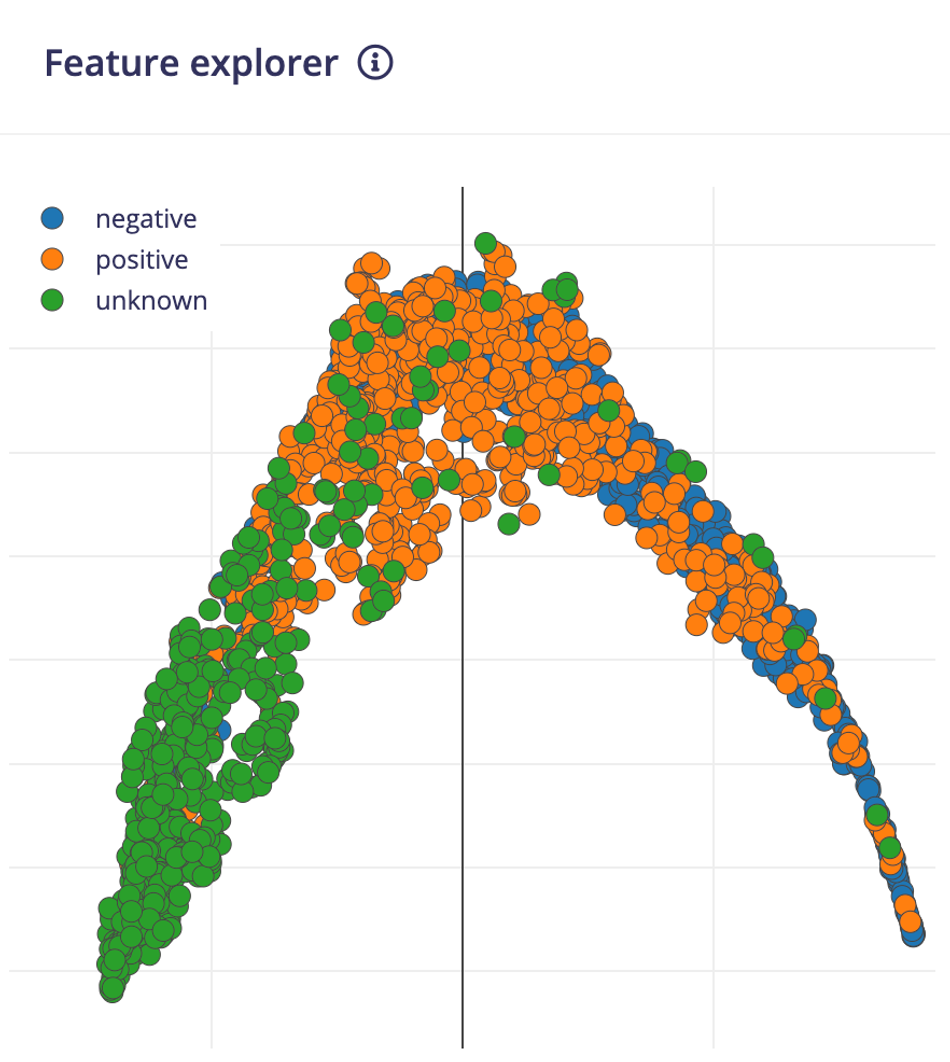
Next, go to the Impulse Design > Image page and set the Color depth parameter as RGB, and click the Save parameters button which redirects to another page where we should click on the Generate Feature button. It usually takes a couple of minutes to complete feature generation.
We can see the 2D visualization of the generated features in Feature Explorer.
Now go to the Impulse Design > Transfer Learning page and choose the Neural Network architecture. We are using the MobileNetV2 160x160 1.0 transfer learning model with the pre-trained weight provided by the Edge Impulse Studio.

The pre-trained model outputs the class prediction probabilities. To get the class activation map, we need to modify the model and make it a multi-output model. To customize the model, we need to switch to Keras (expert) mode.
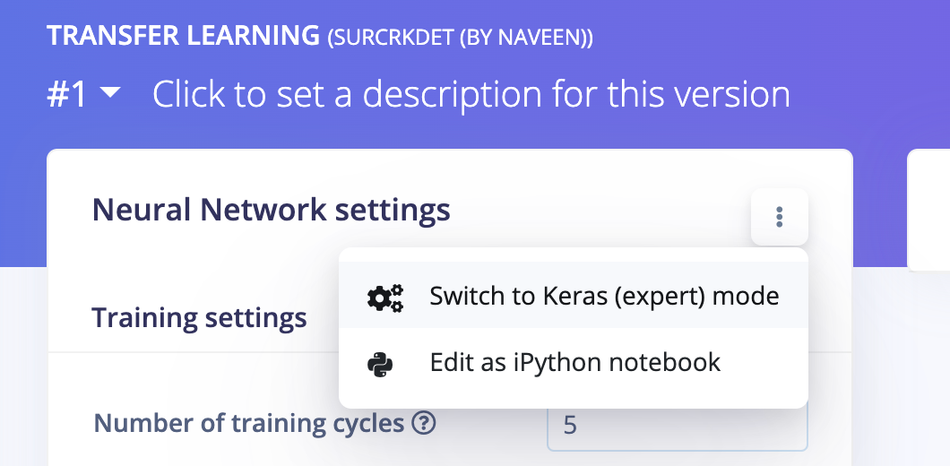
We can modify the generated code in the text editor as shown below.
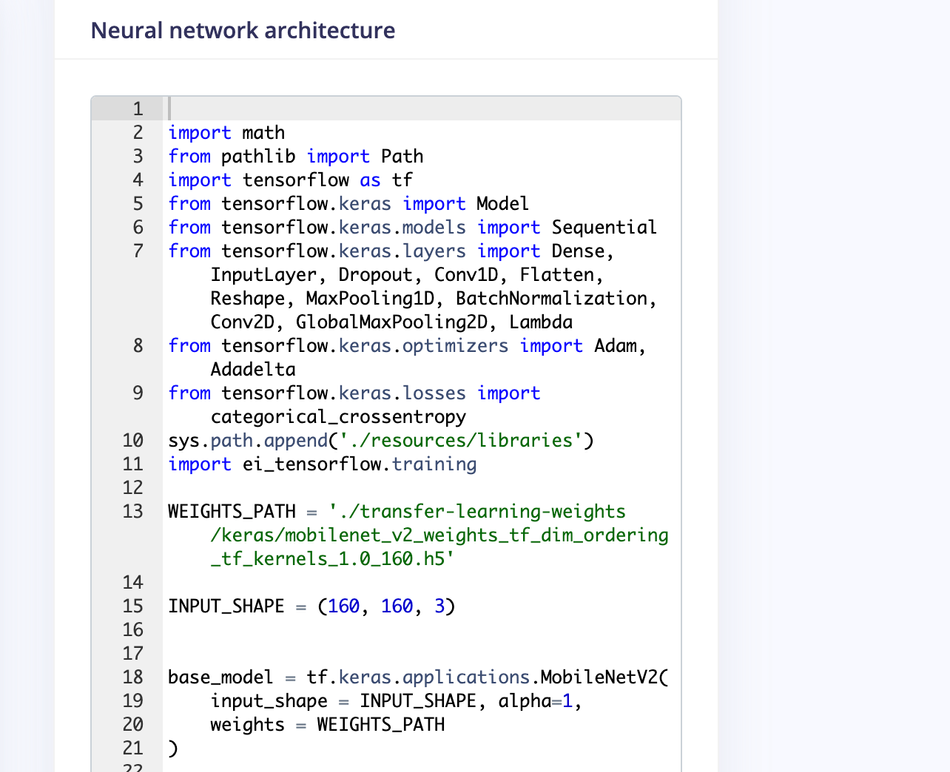
We will connect the 2nd last layer which is a GAP layer to the Dense layer with 3 neurons ( 3 classes in our case). We will be using this Dense layer's weights for generating a class activation map later.
base_model = tf.keras.applications.MobileNetV2(
input_shape = INPUT_SHAPE, alpha=1,
weights = WEIGHTS_PATH
)
last_layer = base_model.layers[-2].output
dense_layer = Dense(classes)
output_pred = Softmax(name="prediction")(dense_layer(last_layer))
For the class activation map, we need to calculate the dot product of the last convolutional block output and the final dense layers' weight. The Keras Dot layer does not broadcast the multiplier vector with the dynamic batch size so we can not use it. But we can take advantage of the Dense layer which internally does the dot product of the kernel weight with the input. There is a side effect in this approach, the Dense layer adds up bias weight to each dot product. But this bias weight is very small and does not change the final normalized values of the class activation map so we can use it without any problems.
conv_layer = base_model.layers[-4].output
reshape_layer = Reshape((conv_layer.shape[1] * conv_layer.shape[2] , -1))(conv_layer)
dot_output = dense_layer(reshape_layer)
We need to resample the dot product output to the same size as the input image (160x160) so that we can overlay the heat map. We use the UpSampling2D layer for this purpose.
transpose = Permute((2, 1))(dot_output)
reshape_2_layer = Reshape((-1, conv_layer.shape[1] , conv_layer.shape[2]))(transpose)
SIZE = (int(INPUT_SHAPE[1] / conv_layer.shape[2]),
int(INPUT_SHAPE[0] / conv_layer.shape[1]))
output_act_map = UpSampling2D(size=SIZE, interpolation="bilinear", data_format="channels_first", name="activation_map")(reshape_2_layer)
model = Model(inputs=base_model.inputs, outputs=[output_pred, output_act_map])
Also, we will be training the model from the last two convolutional blocks and freezing all layers before that.
TRAINABLE_START_IDX = -12
for layer in model.layers[:TRAINABLE_START_IDX]:
layer.trainable = False
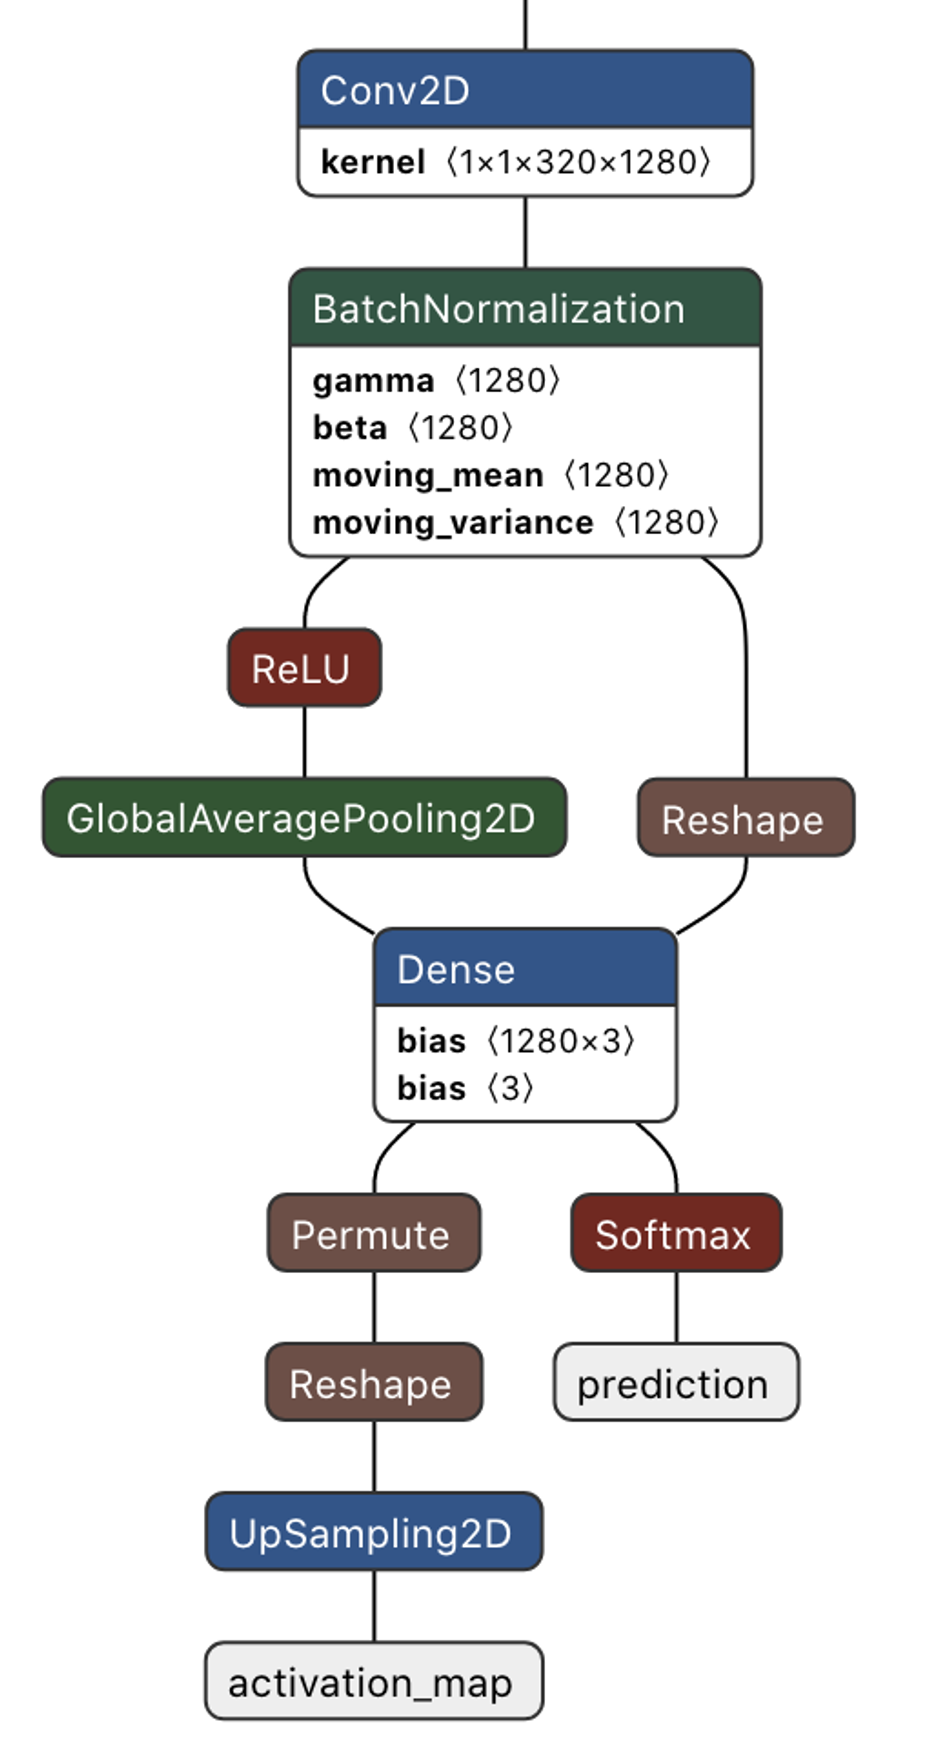
The modified network architecture after the last convolutional block is given below. This is a multi-output model where the first output provides the prediction class probabilities and the second output provides the class activation map.
The full modified training code is as follows (You can access the complete code by visiting this Google Colab link. Alternatively, you can visit the project page on Edge Impulse to access the code).
import math
from pathlib import Path
import tensorflow as tf
from tensorflow.keras import Model
from tensorflow.keras.layers import Dense, UpSampling2D, Permute, Reshape, Softmax
from tensorflow.keras.optimizers import Adam
from tensorflow.keras.losses import categorical_crossentropy
sys.path.append('./resources/libraries')
import ei_tensorflow.training
WEIGHTS_PATH = './transfer-learning-weights/keras/mobilenet_v2_weights_tf_dim_ordering_tf_kernels_1.0_160.h5'
INPUT_SHAPE = (160, 160, 3)
base_model = tf.keras.applications.MobileNetV2(
input_shape = INPUT_SHAPE, alpha=1,
weights = WEIGHTS_PATH
)
last_layer = base_model.layers[-2].output
dense_layer = Dense(classes)
output_pred = Softmax(name="prediction")(dense_layer(last_layer))
conv_layer = base_model.layers[-4].output
reshape_layer = Reshape((conv_layer.shape[1] * conv_layer.shape[2] , -1))(conv_layer)
dot_output = dense_layer(reshape_layer)
transpose = Permute((2, 1))(dot_output)
reshape_2_layer = Reshape((-1, conv_layer.shape[1] , conv_layer.shape[2]))(transpose)
SIZE = (int(INPUT_SHAPE[1] / conv_layer.shape[2]),
int(INPUT_SHAPE[0] / conv_layer.shape[1]))
output_act_map = UpSampling2D(size=SIZE, interpolation="bilinear", data_format="channels_first", name="activation_map")(reshape_2_layer)
model = Model(inputs=base_model.inputs, outputs=[output_pred, output_act_map])
TRAINABLE_START_IDX = -12
for layer in model.layers[:TRAINABLE_START_IDX]:
layer.trainable = False
model.compile(optimizer=tf.keras.optimizers.Adam(learning_rate=0.0005),
loss={'prediction': 'categorical_crossentropy', 'activation_map': None},
metrics={'prediction': ['accuracy'], 'activation_map': [None]})
BATCH_SIZE = 32
EPOCHS=5
train_dataset = train_dataset.batch(BATCH_SIZE, drop_remainder=False)
validation_dataset = validation_dataset.batch(BATCH_SIZE, drop_remainder=False)
callbacks.append(BatchLoggerCallback(BATCH_SIZE, train_sample_count, epochs=EPOCHS))
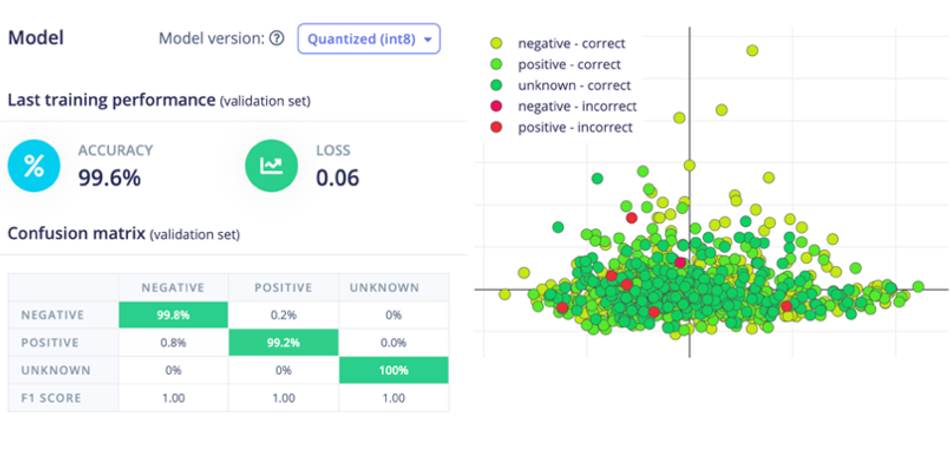
model.fit(train_dataset, validation_data=validation_dataset, epochs=EPOCHS, verbose=2, callbacks=callbacks)Now click the Start Training button and wait around 30 minutes until training is completed. We can see the Training output below. The quantized (int8) model has 99.6% accuracy which is pretty good.
Model Deployment
Currently, Edge Impulse for Linux SDK does not support a multi-output model so we will be using the compiled TensorFlow Lite runtime for inferencing. This interpreter-only package is a fraction of the size of the complete TensorFlow package and includes the bare minimum code required to run inferences with TensorFlow Lite. To accelerate the inferencing, the TFLite interpreter can be used with XNNPACK which is a highly optimized library of neural network inference operators for ARM, and other platforms. To enable XNNPACK for 64-bit Raspberry Pi OS, we need to build the TFLite Runtime Python package from the source. We will need to execute the following commands on a faster Debian/Ubuntu Linux machine with Docker to cross-compile and build the package.
$ git clone -b v2.9.0 https://github.com/tensorflow/tensorflow.git
$ cd tensorflow
$ curl -L -o tensorflow/tools/ci_build/Dockerfile.pi-python37 \
https://github.com/tensorflow/tensorflow/raw/v2.8.0/tensorflow/tools/ci_build/Dockerfile.pi-python37
$ sed -i -e 's/FROM ubuntu:16.04/FROM ubuntu:18.04/g' tensorflow/tools/ci_build/Dockerfile.pi-python37
$ sed -i '30a apt-get update && apt-get install -y dirmngr' tensorflow/tools/ci_build/install/install_deb_packages.sh
$ sed -i -e 's/xenial/bionic/g' tensorflow/tools/ci_build/install/install_pi_python3x_toolchain.sh
To enable XNNPACK for the floating-point (F32) and quantized (INT8) models, add the lines below (shown in the bold) to the tensorflow/lite/tools/pip_package/build_pip_package_with_bazel.sh file.
aarch64)
BAZEL_FLAGS="--config=elinux_aarch64
--define tensorflow_mkldnn_contraction_kernel=0
--define=tflite_with_xnnpack=true
--define=tflite_with_xnnpack_qs8=true
--copt=-O3"
;;
Execute the command below to build the pip package.
$ sudo CI_DOCKER_EXTRA_PARAMS="-e CI_BUILD_PYTHON=python3.7 -e CROSSTOOL_PYTHON_INCLUDE_PATH=/usr/include/python3.7" tensorflow/tools/ci_build/ci_build.sh PI-PYTHON37 tensorflow/lite/tools/pip_package/build_pip_package_with_bazel.sh aarch64
Copy the pip package to the reTerminal.
$ scp tensorflow/lite/tools/pip_package/gen/tflite_pip/python3.7/dist/tflite_runtime-2.9.0-cp37-cp37m-linux_aarch64.whl \
pi@raspberrypi.local:/home/pi
To install the package, execute the command below.
$ pip3 install -U tflite_runtime-2.9.0-cp37-cp37m-linux_aarch64.whl
Now We can download the quantized model from the Edge Impulse Studio Dashboard.

Below is the complete Python script for the inferencing (You can access the complete code by visiting this Google Colab link. Alternatively, you can visit the project page on Edge Impulse to access the code).
#!/usr/bin/python3
import sys
import signal
import time
import cv2
import numpy as np
import traceback
import threading
import logging
import queue
import collections
import matplotlib.pyplot as plt
from matplotlib import cm
from tflite_runtime.interpreter import Interpreter
def avg_fps_counter(window_size):
window = collections.deque(maxlen=window_size)
prev = time.monotonic()
yield 0.0 # First fps value.
while True:
curr = time.monotonic()
window.append(curr - prev)
prev = curr
yield len(window) / sum(window)
def sigint_handler(sig, frame):
logging.info('Interrupted')
sys.exit(0)
signal.signal(signal.SIGINT, sigint_handler)
def capture(queueIn):
global terminate
global zoom
videoCapture = cv2.VideoCapture(0)
if not videoCapture.isOpened():
logging.error("Cannot open camera")
sys.exit(-1)
while True:
if terminate:
logging.info("Capture terminate")
break
prev = time.time()
try:
success, frame = videoCapture.read()
if success:
frame = cv2.rotate(frame, cv2.ROTATE_90_CLOCKWISE)
img = cv2.cvtColor(frame, cv2.COLOR_BGR2RGB)
if zoom:
w, h = 320, 320
x = (img.shape[1] - w) / 2
y = (img.shape[0] - h)/ 2
img = img[int(y):int(y+h), int(x):int(x+w)]
img = cv2.resize(img, (width, height))
img = img / 255.0
img = img.astype(np.float32)
img_scaled = (img / input_scale) + input_zero_point
input_data = np.expand_dims(img_scaled, axis=0).astype(input_details[0]["dtype"])
if not queueIn.full():
queueIn.put((img, input_data))
logging.info('Image Captured')
else:
raise RuntimeError('Failed to get frame!')
except Exception as inst:
logging.error("Exception", inst)
logging.error(traceback.format_exc())
videoCapture.release()
break
def inferencing(interpreter, queueIn, queueOut):
global terminate
global show_heatmap
while True:
if terminate:
logging.info("Inferencing terminate")
break
start_time = time.time()
try:
if queueIn.empty():
time.sleep(0.01)
continue
img, input_data = queueIn.get()
interpreter.set_tensor(input_details[0]['index'], input_data)
interpreter.invoke()
output_0_tensor = interpreter.tensor(output_details[0]['index'])
output_1_tensor = interpreter.tensor(output_details[1]['index'])
output_1 = output_1_scale * ((output_1_tensor()).astype(np.float32) - output_1_zero_point)
pred_class = np.argmax(np.squeeze(output_1))
pred_score = np.squeeze(output_1)[pred_class]
dp_out = None
if pred_class == 1 and show_heatmap is True :
dp_out = output_0_scale * (np.squeeze(output_0_tensor())[pred_class].astype(np.float32) - output_0_zero_point)
if not queueOut.full():
queueOut.put((img, pred_class, pred_score, dp_out))
except Exception as inst:
logging.error("Exception", inst)
logging.error(traceback.format_exc())
break
logging.info('Inferencing time: {:.3f}ms'.format((time.time() - start_time) * 1000))
def display(queueOut):
global show_heatmap
global zoom
global terminate
dimension = (960, 720)
ei_logo = cv2.imread('/home/pi/surface_crack_detection/ei_logo.jpg')
ei_logo = cv2.cvtColor(ei_logo, cv2.COLOR_BGR2RGB)
ei_logo = ei_logo / 255.0
ei_logo = ei_logo.astype(np.float32)
ei_logo = cv2.copyMakeBorder(ei_logo, 0, dimension[1] - ei_logo.shape[0], 70, 70, cv2.BORDER_CONSTANT, None, (255, 255, 255))
ei_logo = cv2.copyMakeBorder(ei_logo, 0, dimension[1] - ei_logo.shape[0], 70, 70, cv2.BORDER_CONSTANT, None, (255, 255, 255))
fps_counter = avg_fps_counter(30)
while True:
if queueOut.empty():
time.sleep(0.2)
continue
start_time = time.time()
img, pred_class, pred_score, dp_out = queueOut.get()
if pred_class == 1:
label = 'Crack'
color = (0, 0, 255)
if show_heatmap and dp_out is not None:
heatmap = None
heatmap = cv2.normalize(dp_out, heatmap, alpha=0, beta=255, norm_type=cv2.NORM_MINMAX, dtype=cv2.CV_8U)
colormap = plt.get_cmap('jet')
img = cv2.addWeighted(img, 1.0, colormap(heatmap).astype(np.float32)[:,:,:3], 0.4, 0)
else:
if pred_class == 0:
label = 'No Crack'
color = (0, 0, 0)
else:
label = 'Unknown'
color = (255, 0, 0)
final_img = cv2.resize(img, dimension, interpolation=cv2.INTER_CUBIC)
font = cv2.FONT_HERSHEY_SIMPLEX
final_img = np.hstack((final_img, ei_logo))
final_img = cv2.cvtColor(final_img, cv2.COLOR_RGB2BGR)
final_img = cv2.putText(final_img, label, (980, 200), font, 2, color, 3, cv2.LINE_AA)
final_img = cv2.putText(final_img, f'({pred_score*100:0.1f}%)', (980, 280), font, 2, (0, 0, 0), 3, cv2.LINE_AA)
fps = round(next(fps_counter))
final_img = cv2.putText(final_img, f'Fps:{fps}', (980, 360), font, 2, (0, 0, 0), 3, cv2.LINE_AA)
final_img = cv2.putText(final_img, f'Heat:{"On" if show_heatmap else "Off"}', (980, 440), font, 2, (0, 0, 0), 3, cv2.LINE_AA)
final_img = cv2.putText(final_img, f'Crop:{"On" if zoom else "Off"}', (980, 520), font, 2, (0, 0, 0), 3, cv2.LINE_AA)
window_name = "Edge Impulse Inferencing"
cv2.imshow(window_name, final_img)
key = cv2.waitKey(1)
if key == ord('a'):
show_heatmap = not show_heatmap
logging.info(f"Heatmap: {show_heatmap}")
if key == ord('s'):
zoom = not zoom
logging.info(f"Zoom: {zoom}")
if key == ord('f'):
terminate = True
logging.info("Display Terminate")
break
logging.info('Display time: {:.3f}ms'.format((time.time() - start_time) * 1000))
if __name__ == '__main__':
log_fmt = "%(asctime)s: %(message)s"
logging.basicConfig(format=log_fmt, level=logging.ERROR, datefmt="%H:%M:%S")
model_file = '/home/pi/surface_crack_detection/model/quantized-model.lite'
interpreter = Interpreter(model_path=model_file, num_threads=2)
interpreter.allocate_tensors()
input_details = interpreter.get_input_details()
#logging.debug(input_details)
output_details = interpreter.get_output_details()
height = input_details[0]['shape'][1]
width = input_details[0]['shape'][2]
input_scale, input_zero_point = input_details[0]['quantization']
output_0_scale, output_0_zero_point = output_details[0]['quantization']
output_1_scale, output_1_zero_point = output_details[1]['quantization']
queueIn = queue.Queue(maxsize=1)
queueOut = queue.Queue(maxsize=1)
show_heatmap = False
zoom = False
terminate = False
t1 = threading.Thread(target=capture, args=(queueIn,), daemon=True)
t2 = threading.Thread(target=inferencing, args=(interpreter, queueIn, queueOut), daemon=True)
t3 = threading.Thread(target=display, args=(queueOut,), daemon=True)
t1.start()
logging.info("Thread start: 1")
t2.start()
logging.info("Thread start: 2")
t3.start()
logging.info("Thread start: 3")
t1.join()
t2.join()
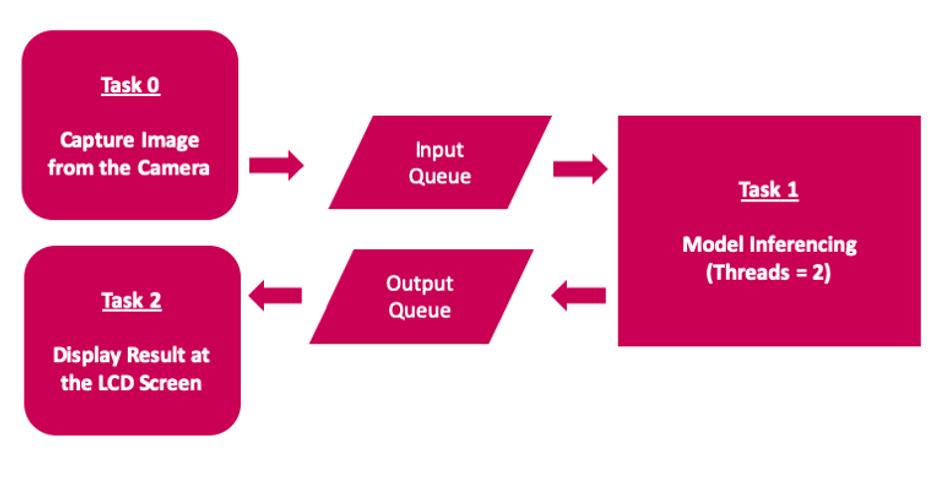
t3.join()Application Workflow Diagram
The application implements multithreading to use all available 4-cores on the Raspberry Pi 4 Compute Module to achieve low latency and better FPS.
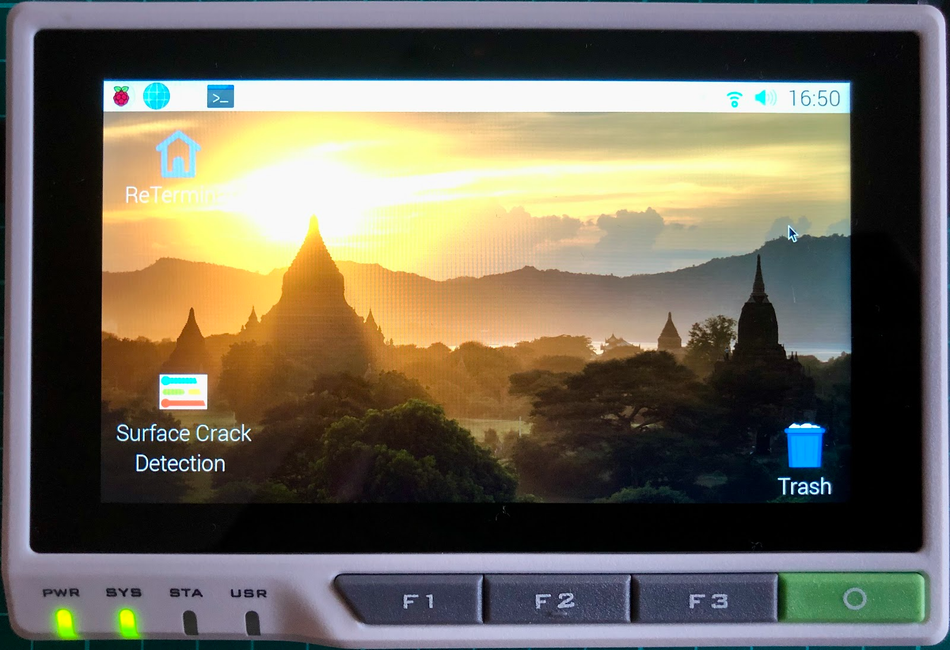
The Desktop App
The inferencing script is executed by clicking on the Desktop App icon which is created by adding an ei.desktop file at the /home/pi/Desktop directory.
[Desktop Entry]
Version=1.0
Comment=Run Inferencing Quantized Model
Terminal=false
Name=Surface Crack Detection
Exec=/home/pi/surface_crack_detection/surface_crack_detection_quant.py
Type=Application
Icon=/home/pi/surface_crack_detection/images/ei_logo.jpg
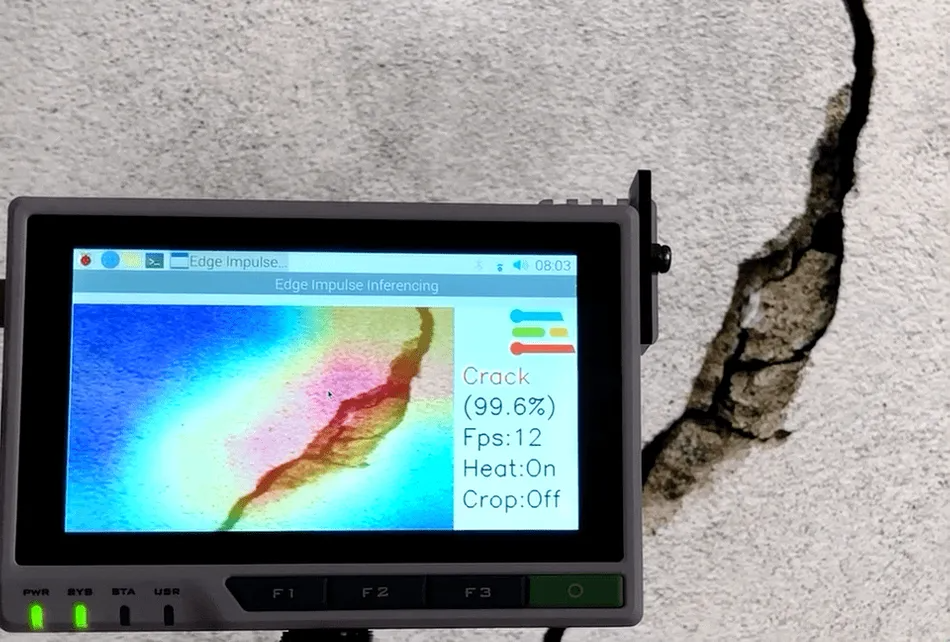
Also, the reTerminal front panel buttons (in the above image) are used for the following functionalities.
F1 button: to toggle heat map
F2 button: to toggle center crop (zoom in) the preview image
O button: to close the app
Conclusion
This project showcases an industrial use case for surface crack detection which can be used for predictive maintenance. The project has the following key characteristics.
Customize the pre-trained transfer learning model in the Edge Impulse Studio Expert Mode
Demonstrate use of a multi-output model trained using Edge Impulse
Runtime heat-map visualization to localize the detected cracks.
Multi-threaded application to increase FPS
A scalable and portable solution
Although the project was created using a Raspberry Pi 4 Compute Module, it can be ported easily to higher-spec edge devices for improved FPS and real-time detection.
This article is based on: Surface Crack Detection with Seeed reTerminal - Expert Projects, a blog by Edge Impulse. It has been edited by the Wevolver team and Electrical Engineer Ravi Y Rao. It's the third article from the Spotlight on Innovations in Edge Computing and Machine Learning Series.
The first article introduced the series and explored the implementation of Predictive Maintenance system using a Nordic Thingy:91.
The second article described the implementation of voice control for making appliances smarter using a Nordic Thingy:53.
The third article dives deep into the application of EdgeAI for surface crack detection, showcasing its transformative role in modern industrial predictive maintenance systems.
About the sponsor: Edge Impulse
Edge Impulse is the leading development platform for embedded machine learning, used by over 1,000 enterprises across 200,000 ML projects worldwide. We are on a mission to enable the ultimate development experience for machine learning on embedded devices for sensors, audio, and computer vision, at scale.
From getting started in under five minutes to MLOps in production, we enable highly optimized ML deployable to a wide range of hardware from MCUs to CPUs, to custom AI accelerators. With Edge Impulse, developers, engineers, and domain experts solve real problems using machine learning in embedded solutions, speeding up development time from years to weeks. We specialize in industrial and professional applications including predictive maintenance, anomaly detection, human health, wearables, and more.
