3 Simple Tests to Recognize High-Quality 3D Scanners with no Calibrated Artifacts Required
In this blog post, Creaform presents three practical tests that require no calibrated artifact to determine whether the performance claimed on technical specification sheets is achievable in real-life scenarios or just numbers without tangible value on paper.
This article was first published on
www.creaform3d.comIn today’s market, it seems like all 3D scanners have similar specifications, as if manufacturers look at their competitors’ data and use the same numbers. Datasheets, marketing videos, and even product appearances all look comparable, making it difficult to distinguish quality based on technical data alone.
So, when faced with multiple options, how can we identify a high-quality 3D scanner?
In this blog post, Creaform presents three practical tests that require no calibrated artifact to determine whether the performance claimed on technical specification sheets is achievable in real-life scenarios or just numbers without tangible value on paper. These tests are intended to help you identify which manufacturers have rigorously developed and tested their 3D scanners.
Form Defect Measurement (Cylindricity)
In GD&T, a form defect is the deviation of a machined part from its ideal shape, such as a plane or a cylinder. A form defect measurement is a good indication of the 3D scanner’s quality because it shows the sensor’s ability to measure the true value of the form defect. High-quality 3D scanners will provide measurements very close to the nominal value, while poor-quality 3D scanners may show significant deviations.
Test #1: Cylindricity Test
A simple cylindricity test can provide valuable insights into the 3D scanner’s raw data quality.
When assessing the quality of a 3D scanner, the primary consideration is the raw data, which undergoes an extensive point filtering process. No doubt, if the raw data is noisy and of low quality, it will lead to questionable 3D models.
See how to perform a cylindricity test
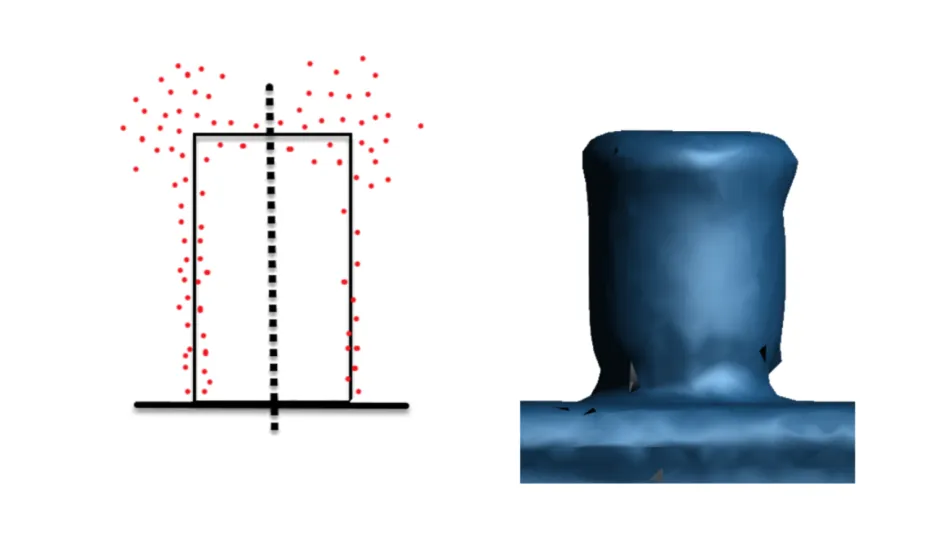
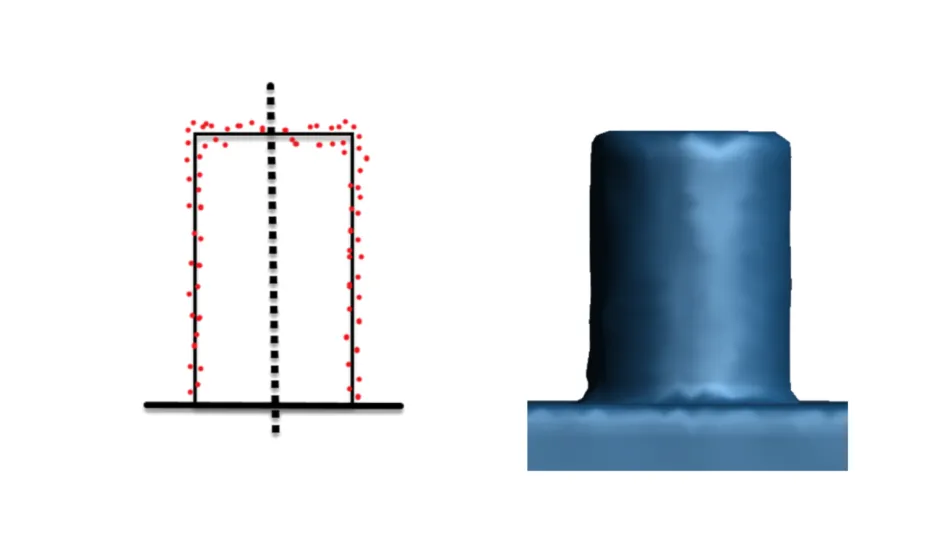
The Result: A Cylinder or a Mushroom
If, at high resolution, you are unable to obtain a good cylindricity value and clearly see the edge of the cylinder at right angles, it suggests that the sensor is capturing poor-quality raw data. This raises concerns about the entire data capture and analysis process.
When a cylinder looks like a mushroom, it indicates that the 3D scanner’s raw data is noisy. As a result, the software uses reconstruction algorithms to smooth the cylinder’s body and edges (and make the data look better), creating a mushroom shape. However, these algorithms can cause various unintended effects.
Poor-quality raw data with lots of noise means a thick point cloud. Therefore, how do we know where the real surface is in this point cloud? How can we ensure the mesh is created using accurate raw data and real surface points? Are there any hidden smoothed surfaces at high resolution that might affect the accuracy of the mesh?
Creaform, Inventor of the Handheld 3D Scanner
As the pioneer of handheld 3D scanners, Creaform possesses unique expertise that ensures the quality of acquired data with minimal noise. Consequently, surface reconstruction algorithms perform more effectively because they do not need to smooth low-quality surface points, thus guaranteeing consistently high quality.
Test #2: Volumetric Accuracy Test
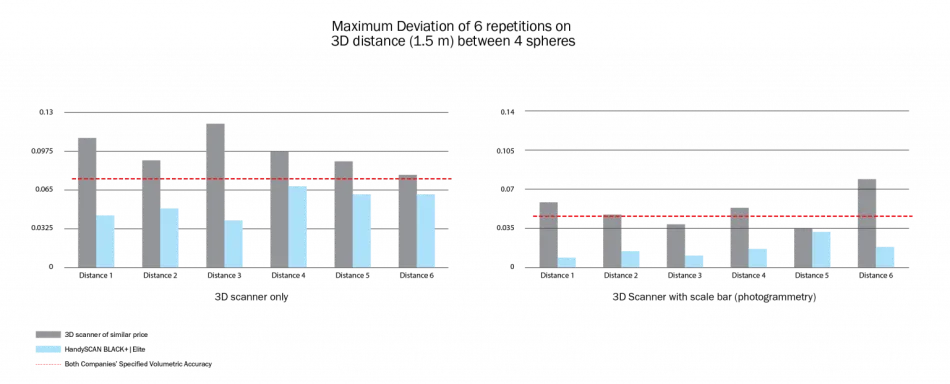
This test aims to show the consistency of the 3D scanner’s measurements. A high-quality 3D scanner must be repeatable, i.e., produce repeatable measurements with minimal variation. In contrast, a low-quality 3D scanner may yield inconsistent results when measuring the same part multiple times or when measured by several operators.
Consequently, when measurements are taken multiple times on the same part, the results must be grouped and similar whether one or several operators take them.
Repeatability test: One operator performs five consecutive measurements
Reproducibility test: Five operators each perform the same measurement
Both tests should present grouped results.
A calibrated reference tool or artifact is not required to assess volumetric accuracy. You can measure any part within a certain period (e.g., same day, same hour). The results are even more evident on large parts.
See how to perform a volumetric accuracy test
The Result: Same Part, Identical Dimensions or Not
If the results are not grouped, it is a good indicator that the volumetric accuracy claimed on the datasheet is probably wrong.
If you measure the distance between two planes that are 2 meters apart, and this distance varies by more than 15µm/m, meaning 30µm over two consecutive measurements, it is difficult to claim that the 3D scanner has a volumetric precision of 15µm/m.
In other words, if you measure a car twice in a row, and the first time it measures a certain dimension, and the second time it measures 2mm less, how can the sensor have a volumetric accuracy below 1mm/m? And, when two measurements differ, which one is the correct one?
Creaform, 20+ Years of Innovation in 3D Scanning
Creaform has encountered similar issues during its initial years of research and development but has developed the knowledge and expertise to overcome and solve them. Given Creaform’s 10-year lead in innovation and product development over other 3D scanner manufacturers in the market, we can see what problems some manufacturers have been unable to resolve.
Test #3: Thermal Stability Test
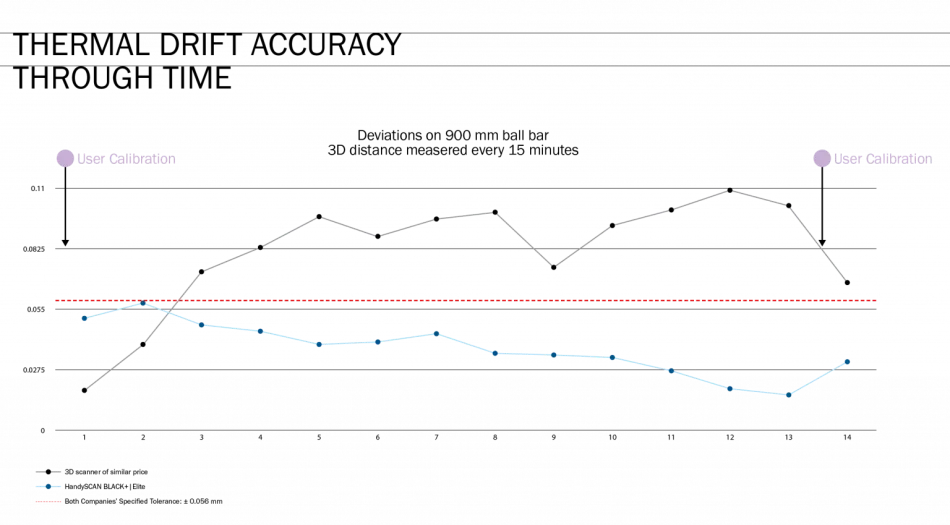
Another indicator of a 3D scanner’s quality grade is its performance under varying environmental conditions, such as temperature. High-quality 3D scanners are designed to remain stable under different conditions, while poor-quality scanners may be more susceptible to environmental changes.
Another way to distinguish high from low quality is the frequency to which the 3D scanner requires recalibration to maintain accuracy. High-quality 3D scanners generally remain calibrated for longer periods. In contrast, poor-quality 3D scanners might drift quickly and require frequent recalibration.
To perform this test, simply connect your 3D scanner and measure a part, any part. Then, repeat the measurement after 20 minutes, 1 hour, and 2 hours. Then, place the results on top of each other. Are the results consistent?
See how to perform a thermal stability test
The Result: Constant Recalibration Required or Not
With high-quality 3D scanners, various mechanisms (mainly software) manage thermal expansion within the sensor, ensuring stable and reliable measurements over a long period of time. However, these mechanisms are absent for low-quality 3D scanners, so results tend to drift.
The solution to address repeatability and thermal drift issues is to recalibrate the 3D scanner. However, it can quickly become inconvenient, even painful, for users to recalibrate their sensor each time they use it throughout the day.
Creaform: High-Quality Born from Rigor and Learning
Since 2005, Creaform has gained extensive knowledge and expertise in software development and mechanical design. This expertise includes lens design, finite element analysis of component heating, heatsink location, and more.
All this expertise in mechanical engineering has been developed for both the optomechanical structure (developing the lenses to the CMOS sensor) and the physical structure (precisely placing the handgrip on the external structure of the sensor to avoid applying pressure and moving the cameras). This insight also includes the user and factory calibration processes.
Thanks to this continuous learning and improvement, Creaform has consistently been able to subtract micrometers—not only on the specification sheet but in real life. This is what we refer to as accredited accuracy (link to previous blog). Our focus goes beyond numbers written on data sheets. We strive to demonstrate and maintain stability and repeatability in real-world applications, always aiming to showcase the high quality of Creaform 3D scanners.
