Orca Slicer vs. Cura: A Technical and Practical Comparison
A detailed comparison of Orca Slicer vs Cura, two leading 3D printing slicers, evaluating slicing algorithms, features, usability, and real-world print results

17 Mar, 2025. 10 minutes read
No time now? Save for later.
We only use your email to send this link. Privacy Policy.
Choosing the right 3D slicing software can significantly impact your print quality, speed, and material efficiency. The slicer translates your 3D models into machine instructions, and its algorithms determine how your printer forms each layer. In the 3D printing community, Orca Slicer and UltiMaker Cura are two of the most popular slicer options, each with passionate users. Orca Slicer is a relatively new contender derived from the Bambu Studio/PrusaSlicer family, whereas Cura is a long-established open-source slicer maintained by Ultimaker (now UltiMaker) and trusted by millions of users worldwide.
This article provides a detailed, data-driven comparison of Orca Slicer vs. Cura. We’ll examine their feature sets, slicing algorithms, and usability side by side. By the end, you’ll gain insight into the strengths and weaknesses of each, learn which slicer might suit different applications (from hobbyist projects to industrial prototypes), and get a glimpse of future trends in slicing technology. The goal is to help digital design engineers, hardware engineers, and engineering students make an informed choice for their 3D printing workflow.
What is a 3D Slicer?
A 3D slicer is a software tool that converts a 3D model (typically in STL, OBJ, or 3MF format) into instructions that a 3D printer can execute. In essence, the slicer acts as the crucial link between your digital design and the physical printed object. It “slices” the 3D model into many 2D layers and generates a toolpath for each layer, outputting a G-code file.[1] This G-code contains commands for the printer’s motors and extruder, telling it where to move, how fast to travel, when to extrude plastic, what temperature to maintain, and so on.
By adjusting slicer settings, users can influence print quality (layer thickness, infill density, support structures), print speed, and material usage. For example, a slicer will let you choose infill patterns (which affect strength and filament consumption, as well as energy consumption) and support generation (to properly print overhangs).[2] Modern slicers also perform optimizations like adjusting extrusion flow for corners or small features, and can even preview the print layer-by-layer. Without slicer software, a 3D printer cannot interpret a raw 3D model. This is why selecting a good slicer and tuning its settings is as important as the printer hardware itself.
Overview of Orca Slicer and Cura
Orca Slicer, launched in 2023, is a community-driven fork of Bambu Studio, itself derived from PrusaSlicer. While newer, it builds on proven foundations and integrates features optimized for high-speed printing. Orca includes around 130 preset printer profiles for brands like Creality, Prusa, Voron, and AnkerMake, and it allows users to create custom profiles. It supports standard file formats and advanced printing features like pressure advance and input shaping. While Cura offers more preloaded profiles, Orca provides automated calibration tools, making it well-suited for users who want precise control over their printer and materials.
Cura is one of the most widely used slicers, originally developed by David Braam and later adopted by UltiMaker.[3] As an open-source project, it has introduced key innovations like tree supports and gyroid infill. Cura supports hundreds of printers out-of-the-box, more than most slicers, and allows custom printer profiles. It also includes a large library of preset material profiles, making it easy to fine-tune prints. Developed by UltiMaker, Cura remains free and cross-platform, with an active community, numerous tutorials, and a plugin marketplace for expanded functionality.
Feature Comparison
In this section, we’ll compare the key features of Orca Slicer and UltiMaker Cura, highlighting the strengths and unique functionalities of each. While both slicers offer powerful capabilities, they cater to different user preferences and project needs. Orca Slicer excels in automation, speed, and cutting-edge features, while Cura stands out for its broad compatibility, ease of use, and refined settings. By examining these differences, you can better understand which slicer suits your 3D printing workflow and goals.
Printer and Material Support
Both Cura and Orca Slicer primarily target FDM 3D printers and support a wide range of materials, including PLA, ABS, PETG, TPU, and nylon, with appropriate settings. Cura has the advantage in official printer profiles, with hundreds of supported models and a Marketplace that includes material profiles from manufacturers. Orca Slicer, while offering fewer bundled profiles, covers all major open-source printers, including Bambu Lab and Prusa models. It is designed to work with Marlin, Klipper, and other common firmware, ensuring broad compatibility.
Both slicers allow custom filament profiles. Cura includes many material presets and recommends UltiMaker brand materials with optimized settings. Orca Slicer requires users to rely on provided presets or manually calibrate filaments but simplifies the process with automated tests for parameters like flow, temperature, retraction, and pressure advance.
User Interface
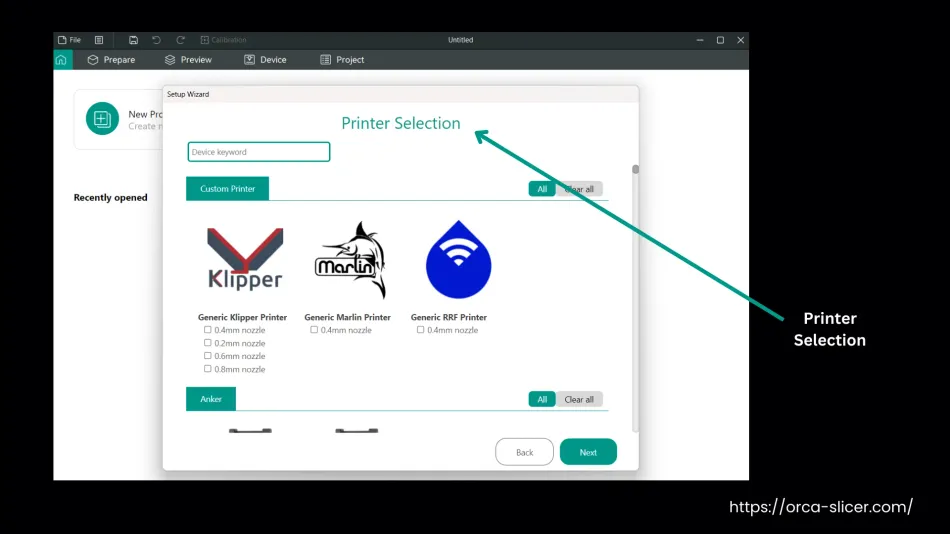
Orca Slicer’s layout is similar to PrusaSlicer and Bambu Studio, with a left-side panel organizing print, filament, and printer settings. It displays many options by default but allows collapsing sections and toggling expert mode for advanced features. While Cura eases beginners in, Orca caters more to experienced users with faster access to settings, dark mode, tooltips, and visual previews. Users familiar with PrusaSlicer can adapt quickly, but newcomers may find the interface overwhelming at first.
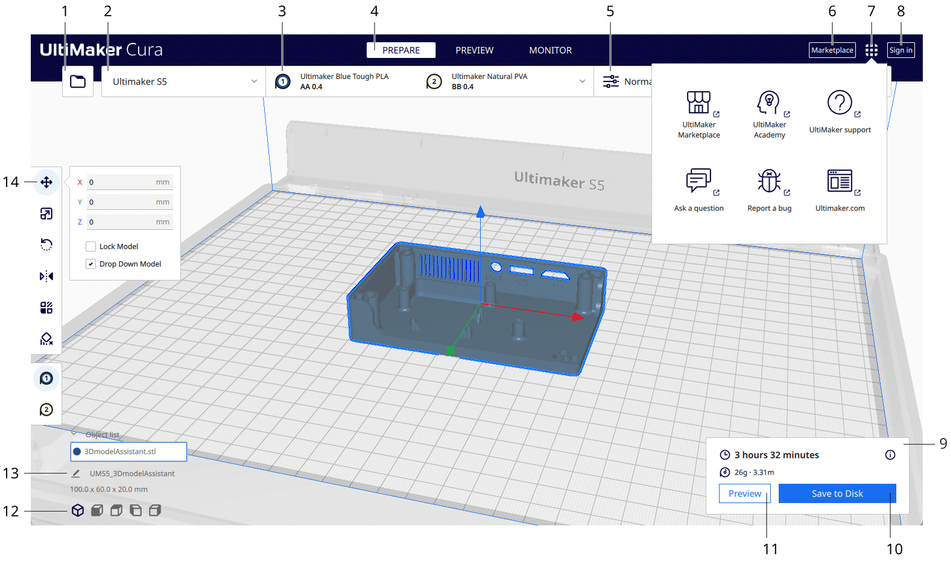
Cura features a clean, modern interface with a central 3D model viewer, a left toolbar for transformations, and a right panel for print settings. It uses a tiered settings system (Basic, Advanced, Expert) to prevent overwhelming beginners while offering over 400 settings in expert mode. Helpful UI features include layer preview, print time estimates, and an X-ray mode for detecting mesh errors. While intuitive, Cura’s layout differs from PrusaSlicer, requiring a slight learning curve for those switching.
Print Settings and Customization
Orca Slicer, based on PrusaSlicer, provides deep customization but emphasizes efficiency and automation. While it includes standard controls for walls, speeds, and infill, it stands out for its smart defaults and built-in calibration tools. Features like variable layer height, automatic bridging adjustments, and pre-configured calibration prints (for temperature, retraction, and flow) simplify optimization. Orca’s auto modes handle many settings dynamically, reducing manual tuning while still allowing experienced users to tweak parameters. This makes it a strong choice for those who want high-quality results with minimal effort but still have the option for detailed adjustments.
Cura provides one of the most extensive sets of customization options among slicers. It offers fine control over nearly every aspect of slicing, from basic settings like layer height and infill density to highly detailed adjustments such as retraction extra prime amount and combing mode. There are over 20 travel settings, 15+ infill patterns, and a dedicated “Experimental” section featuring advanced options like fuzzy skin and wire printing. This level of detail allows experienced users to optimize print quality to a fine degree, though the vast number of settings can be daunting for beginners.
Recommended reading: Cura Infill Patterns: What They Are and When to Use Them
Unique Features
Orca Slicer: Standout Features
Automatic Calibration Routines: Orca simplifies calibration with an integrated menu that runs print tests for multiple temperatures or retraction distances, helping users quickly dial in settings.
Painting and Custom Supports: Orca allows “paint-on supports” and height-based modifiers, giving users more control over support placement than Cura’s automatic options. It also supports multi-material prints, letting users assign extruders or colors to specific areas.
AI Failure Detection and Networking: Orca integrates with Bambu Lab printers (or other supported devices) for AI print failure detection and remote monitoring. It can pause prints if a failure is detected and send prints directly to the printer via the network.
Arc Generation for Smoother Curves: Orca supports G2/G3 arc commands, allowing for true arcs instead of line segments, improving circular features’ quality and reducing printing time. Cura lacks native arc support.
Variable Layer Height and Adaptive Infill: Orca supports variable layer heights and adaptive infill, allowing for detailed prints with thin layers and faster prints with thicker layers. Cura uses a single layer height and lacks adaptive infill without additional tricks.
UltiMaker Cura: Standout Features
Plugin Marketplace: Cura’s Marketplace allows users to install plugins for new features and integrations, such as OctoPrint connectivity, CAD software integration (SolidWorks, Siemens NX), UI themes, and SLA printer slicing. This extends Cura’s functionality significantly.
CAD Integration and Thingiverse: Cura integrates with CAD programs and Thingiverse. Users can search and download models from Thingiverse or open models directly from CAD, streamlining the design process.
X-Ray Mode for Model Repair: Cura’s X-ray view highlights model issues (like holes or flipped normals), helping prevent print failures and enabling model repairs.
Material Profiles and Settings Visibility: Cura offers a variety of material profiles, adjusting settings like temperature and cooling. Users can search for settings by name and customize profiles for quick access, ensuring consistency in professional environments.
Performance Comparison
Both Orca Slicer and UltiMaker Cura are capable of delivering high-quality 3D prints, but they excel in different areas, offering users unique advantages depending on their needs. Ultimately, both slicers are highly capable, with Orca offering faster speeds and more automation, while Cura provides more reliable and user-friendly results out of the box.
In terms of print quality, both slicers produce accurate dimensions and smooth surfaces. Orca Slicer’s variable layer height feature gives it an edge when printing curved surfaces, as it uses thinner layers in these areas, creating smoother contours. Cura, with its Arachne engine, excels at ensuring fine details are preserved, especially in thin walls and small features. While both slicers perform well, Orca’s defaults might require some tuning for optimal results, whereas Cura’s settings are more refined out of the box.
Speed is another notable difference. Orca Slicer tends to be faster in both slicing and printing. Its lighter, more efficient code allows it to slice large models more quickly and with less resource usage compared to Cura, which can feel slower on older machines. In actual print time, Orca’s default settings lead to slightly faster prints due to higher default speeds, though this might come at the cost of some fine details, like minimal ringing on sharp corners.
Regarding filament efficiency, both slicers use similar amounts of filament for basic structures, with Cura’s tree supportsusing less material than Orca’s standard grid supports. However, Orca’s streamlined movement patterns may help save small amounts of filament during the printing process.
In terms of reliability, Cura has the advantage of a large, established user base and frequent updates, ensuring extensive troubleshooting resources. Orca, while newer, benefits from the PrusaSlicer codebase and is actively maintained with regular updates, though it might lag behind in adopting cutting-edge features.
Applications Comparison
Hobbyist and DIY 3D Printing
For beginners, Cura is an excellent choice due to its guided setup, large community support, and ease of use with popular printers. It's ideal for novice users looking to get started quickly with minimal tweaking. For more advanced hobbyists or those with custom printers, Orca Slicer offers sophisticated features like calibration tools, multi-color printing, and better support for complex filaments, making it great for those who want more control. Many hobbyists use both slicers for different needs.
Professional Prototyping and Product Development
Cura excels in professional environments due to its reliability, broad printer profile library, and integration with CAD tools, making it perfect for collaborative workflows and precise prototyping. Orca Slicer is ideal for multi-material projects or rapid prototyping with high-speed printers, but lacks official support, which might be a concern for businesses that require vendor-backed troubleshooting.
Industrial and Precision Manufacturing
In industrial settings, Cura is preferred for its reliability, integration with MES systems, and support for print farms, making it ideal for large-scale production and consistency. Orca Slicer, while newer, is gaining traction with faster printers and high-efficiency profiles, offering an edge for users focused on throughput and modern machine support. For high-precision applications, both slicers can achieve similar results, but Orca’s advanced features like input shaping might offer a slight advantage on high-end machines.
Education
In educational settings, Cura is commonly used due to its simplicity and widespread application, making it easy for students to learn quickly. It’s often introduced in introductory courses. Orca Slicer, however, may be explored in more advanced coursework, particularly when dealing with calibration, materials science, or comparing slicing strategies. For engineering students, it’s beneficial to become familiar with both slicers, as knowing how to use multiple tools adds flexibility in future projects or jobs.
Recommended reading: How to Make a 3D Model for Printing
Conclusion
Both Orca Slicer and UltiMaker Cura are highly capable slicers, each with its own strengths. Orca Slicer focuses on efficiency, automation, and advanced features like calibration and support painting, delivering excellent print quality with faster times and fewer adjustments. It's ideal for printers like Bambu Lab, Prusa, and Voron, or complex multi-material prints. However, it has a smaller community and fewer profiles than Cura.
UltiMaker Cura excels in usability, compatibility, and customization. It produces reliable, high-quality prints with broad support for various printers and extensive settings. While it may not adopt cutting-edge features as quickly as Orca, it remains an all-rounder that works with almost any printer, backed by a vast online community.
If you have a Bambu Lab or Prusa printer or enjoy fine-tuning, Orca Slicer is a great choice, especially for multi-material or complex prints. On the other hand, if you're a beginner, work with various printer brands, or need maximum control over specific settings, UltiMaker Cura is likely a better fit. Many users use both slicers depending on the task, experimenting with different settings or models. Both being free, you can explore and find the best workflow for your needs. In the end, the best slicer is the one that suits your print objectives, and familiarity with both can enhance your 3D printing experience.
Frequently Asked Questions
What are the main differences between Orca Slicer and Cura?
Orca Slicer is a feature-rich fork of Bambu Studio/PrusaSlicer focusing on advanced features, while Cura offers a user-friendly interface with broad printer support and more plugins.
Which slicer provides better print quality?
Both slicers can deliver excellent print quality, but Orca offers more tuning tools, while Cura provides refined default profiles.
How do slicing algorithms impact final print outcomes?
Orca’s algorithms optimize layer height, flow, and arc movements, while Cura’s Arachne algorithm enhances perimeter accuracy and fine details.
Is Orca Slicer or Cura better for high-speed printing?
Orca is better suited for high-speed printing with built-in optimizations, while Cura can also handle speed but requires more manual adjustments.
References
[1] Kurkowski E, Van Stockum A, Dawson J, Taylor C, Schulz T, Shenoi S. Manipulation of G-code toolpath files in 3D printers: Attacks and mitigations. InInternational Conference on Critical Infrastructure Protection 2022 Mar 14 (pp. 155-174). Cham: Springer Nature Switzerland.
[2] De Bernardez L, Campana G, Mele M, Sanguineti J, Sandre C, Mur SM. Effects of infill patterns on part performances and energy consumption in acrylonitrile butadiene styrene fused filament fabrication via industrial-grade machine. Progress in Additive Manufacturing. 2023 Apr;8(2):117-29.
[3] Wickstrom S. Evolution of 3D printing applications [Internet]. UltiMaker; Published January 30, 2025. [Accessed March 17, 2025].
in this article
1. What is a 3D Slicer?2. Overview of Orca Slicer and Cura3. Feature Comparison4. Performance Comparison5. Applications Comparison6. Conclusion7. Frequently Asked Questions8. ReferencesNo time now? Save for later.
We only use your email to send this link. Privacy Policy.